Why We Eat Spaceships with Tails - sprouting legumes and grains is worth it!

There is only so much time in a day, why on earth is sprouting legumes, grains or seeds a good idea?

Let me make myself perfectly clear. Sprouting takes less than 4 minutes of your time from start to finish. That 4 minutes will pay you back exponentially.

Exponential improvement in the health of you and your tribe allowing you to live and be your best!  A promise about soaking stuff in water first?  Yes indeed!

Sprouting is something I started doing to help our 15 year old daughter as she battles c diff colitis Remember the Big MAC diet post?

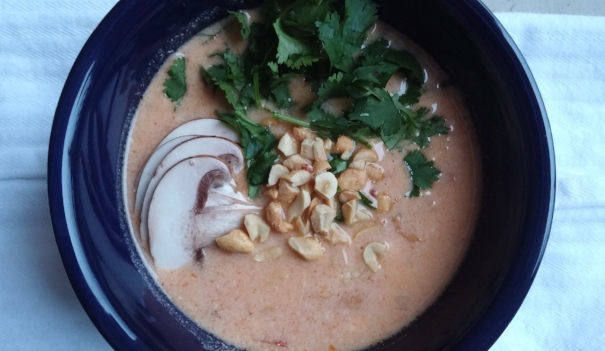
Microbiota Accessible Carbohydrates….these are the Big MAC’s we LOVE at our house. I add sprouted legumes to EVERYTHING and in so doing help our daughters gut heal while improving our own health.

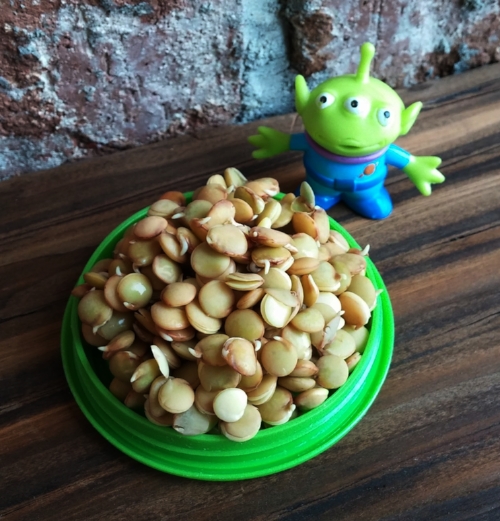
They aren't just good for her, they are good for all of us! Our uber picky 8 year old almost died and refused to eat the "tail" the first time he saw sprouted lentils added to a burrito.  I laughed and told him, "dude, you need to eat the whole spaceship with the tail." Sold.

  • Legumes are packed with the fiber the critters in our intestines (gut microbiome) LOVE to eat. The equation is simple. High fiber foods = food for intestinal bacteria = stronger microbiome.
  • Fiber is what the critters in your gut eat. Well-fed gut critters = happy, healthy gut critters. Check.
  • Fiber keeps you full longer. Check.
  • Fiber saves you time sitting on the porcelain throne. Check.
  • Sprouting legumes prior to eating helps make them easier to digest (shhh this means less gas). Check.
  • Cheap plant based protein - 1/2 cup cooked lentils have 8 grams of protein. Double Check.
  • Dry legumes are super cheap. Less than $1 a pound at any grocery store. Last time I was at Costco, organic chicken was about $6 a pound. You have math skills too. Check.

Plenty of reasons to want to add legumes, grains and seeds to your diet but sprouting them first? Yes!!!

Sprouting – DISCLAIMER… if they smell weird, are slimy or moldy….DO NOT EAT THEM!!!!

If you have a mason jar you can do this. Nothing technical, nothing wacky.

Benefits of Sprouting

Complex carbohydrates are broken down into easier to digest carbohydrates = less gas.

Sprouting also allows for our body to absorb more nutrients = more vitamins and minerals to help the cells in our body fight and be its strongest.

If you are sprouting legumes or grains, they will cook faster. Check

Ever head of alkaline (plant based foods) vs acidic (sugar and heavily processed foods) foods? The more alkaline the better. Guess what, sprouting makes legumes, grains and seeds more alkaline which is SUPER AMAZING for our body!!!

If you are still reading, there is a chance you might try sprouting. Seriously it takes nothing fancy.

Here are the steps to sprout your own goodness:

  • Rinse 1 cup of lentils (legumes, grains or seeds)
  • Place rinsed lentils in a 1 qt mason jar
  • Fill jar to the shoulder with water and let it sit overnight or for about 12 hours
  • Use your fingers and hand as a colander (or cheese cloth secured with a ring) and drain water.
  • Prop jar on a towel at an angle to allow for drainage and air flow.
  • Rinse 2-3 times a day by filling the jar with fresh water and pouring it out again using your fingers and hand or cheesecloth  as a strainer. Continue to prop jar on a towel at an angle. Your sprouts are ready when they have ¼ inch “tails.” (After the overnight soak, it takes until about the end of the second day to get them to sprout.)
  • Place sprouted lentils in a medium saucepan and add water to cover plus an inch or so. Bring to a boil then cover with a lid and simmer for 15-20 min or until tender. Each legume or grain will have a different cooking time BUT it will be faster than a non-sprouted legume or grain.  Freeze extra in zip lock baggies, all ready portioned.

WHERE TO USE SPROUTED grains or legumes –

SALADS, SOUP, CASSEROLES, SCRAMBLED EGGS and add to meat dishes like tacos, shredded bbq. You name it and I will have been accused of adding lentils to it.

They are amazing in everything and with everything!!! There is also a really good chance you can get away with them added to brownies and cookies too. Shhhh!

Sign up so you don't miss a post. Like, follow, pin or comment - I would love to hear your questions so I know what to do to better help you understand easy, awesome ways to improve your health!

Brooke

Amazing Almond Crusted Chicken Nuggets

Chicken nuggets gag me.

Except occasionally from Chick- fil- A, those are tasty – just not great for your body.

Chicken nuggets that are made from pieces and parts and are extruded to special shapes gag me.

They also gag my children, especially when they get a chewy part.  You know what I’m talking about. We call those parts chicken toe nails. Ewwww! It is so nasty to get a bite of chicken with the texture of a toenail blended in.

I have spent the last 3 months revamping how we eat due to the c diff colitis infection our 15 year old is battling.  One of the things we have done is to make sure she gets plenty of healthy sources of protein to help her body heal.

Whenever you are sick, your body needs more protein to repair.

Chicken nuggets are a classic go-to for easy fast and yummy. When they are homemade they do take more time BUT you eliminate the gag factor.

One of our new favorite dinner recipes is a chicken nugget you don’t have to fear because you know where the chicken comes from.

The coating is gluten-free and super delicious.

We love it because it doesn’t call for breadcrumbs. We have almost eliminated all bread from my daughter’s diet - simple highly processed foods (she won’t eat 100% whole wheat bread) make bacteria thrive. We want c diff to die not thrive!

If you are trying to EAT less processed foods, FEWER carbs and more WHOLE FOODS, this recipe is for you! Bonus – it’s super tasty, especially with a slice of fresh squeezed lemon across the top.

Amazing Almond Crusted Chicken Nuggets!

Amazing Almond Crusted Chicken Nuggets!

Awesome Almond Crusted Chicken Nuggets

  • 1 pound chicken tenders or chicken breast (sliced in ¼ inch chunks)
  • 1 cup almond meal (flour) (Costco has the best price I’ve found)
  • 1 cup grated parmesan cheese
  • ¼ tsp smoked paprika
  • Pepper
  • 2 large eggs

Set oven to 375 degrees and line a baking sheet with a silpat or parchment paper.

Combine almond meal, parmesan, paprika and pepper in a small bowl. Beat eggs in separate bowl. Dip chicken pieces in egg then almond mixture and place on prepared baking sheet. Transfer to the oven and bake until golden brown and cooked through, about 15-20 minutes. Remove from oven and top with a squeeze of lemon. It’s like a burst of warm sunshine….so tasty!

Thanks for reading! Give this recipe a try, your body and your taste buds will appreciate it!

Brooke

Registered Dietitian Nutritionist

The Big MAC Diet, Why it will Change YOUR Life and a Thai Recipe!

Oh those golden arches, breakfast all day every day, dollar menu and a scary clown!

What is not to love about all things Mickey D? 

A Big MAC diet - let's learn more! ….drooling, oh yeah baby…duh duh duh da duh I’m lovin’ it!

From the last blog post you learned about the biggest mistake of my life and how it could help you. My reading comprehension error with an antibiotic prescription lead to a serious c diff colitis infection in our 15 year old. Three months later she is still fighting this demon.

Every time we eat we either do something to build our bodies or tear them down. Bite by bite, every day, every meal. We are focusing on doing everything possible to help our daughter heal from the horrible demon inside her.

I haven’t been to a McDonald’s in years so the idea of eating a Big Mac is quite goofy to me. HA! Wrong Big MAC.

This Big MAC diet is actually one that will help your gut heal (a major focus at our house), improve your weight, mood and long-term health. Did you know your gut is linked to so many things?

Big MAC is a term from the book, The Good Gut, by Justin and Erica Sonnenburg. It has been one of my favorite books as I have researched different ideas to help our daughter heal from her intestinal infection.

A MAC is a microbiota accessible carbohydrate. Huh? A carbohydrate that the critters in your gut use for fuel. Giving your gut critters the nutrients they need to thrive will improve your body on so many levels. Duh, duh, duh, duh da….your gut microbiome is lovin’ it!

Think complex carbohydrates: fruit, veggies, legumes and unrefined whole grains. The more diverse your intake, the better it helps the good bacteria in your gut thrive.

These Big MAC’s LOVE fiber and act like a recycling facility, pulling out the good stuff from the goop headed out the back end and it actually improves your health when these critters eat well.

Fiber is not just for binding cholesterol or keeping you for getting plugged up. Fiber fuels those critical microbes in your gut. When they have what they need, they give you what you need.  A happy gut microbiome leads to protection from crud leaking across the gut membrane and into your body. Crud that makes you sick.

Fiber comes from carbohydrates and carbohydrates are not the most popular nutrients of the day. Most foods that come in a package, food handed to you in a paper bag out of a drive through window and almost everything but the outer perimeter of a grocery store is what earned carbohydrates a bad rap.

Heavily processed crap food that tastes delicious, is super cheap and comes in a crinkly wrapper. Those are the carbohydrates that need avoidance.

Fruit, veggies, unrefined whole grains and legumes. EAT these carbohydrates.  Every day, all day to give your gut microbes what they need to thrive and keep you healthy.

This is our favorite new recipe for our big MAC combo meal…it’s SOOOO good!  It’s mild yet flavorful and our pickest picky of all LOVES it! 

THAI RED CURRY SOUP

  • 1 pound chicken (turkey, tofu, etc), sliced in thin bite sized pieces
  • 1 Tbsp coconut oil
  • 1 red bell pepper, diced
  • 1 medium onion, diced
  • 3 cloves minced garlic
  • 1 ½ Tbsp grated ginger (I use a microplaner)
  • 3 Tbsp red curry paste (it’s very mild, you don’t need to be afraid and the Thai Kitchen brand is yummy and easy to find at Walmart, Kroger, Target, etc)
  • 3 – 13.5 ounce cans full fat, unsweetened coconut milk (coconut fat is healthy fat)
  • Juice of 1 lime

Optional veggies: diced carrots, diced sweet potato, mushrooms, zucchini, eggplant, broccoli, cauliflower, zucchini, chard, kale…if you love it…add it!

In a medium sauce pan heat oil on medium, cook chicken until cooked completely through. Add diced pepper and onion. Sauté until soft. Add garlic and ginger and cook until its fragrant (a minute or so). Add curry paste and unsweetened coconut milk; stir until curry paste is fully dissolved. Let simmer for 20 minutes or so for the flavors to merry. Add juice of one lime and top with more deliciousness!

Top with chopped dry roasted peanuts, cilantro, mung bean sprouts and a wedge of lime.

Recipe scales easily depending on how big your crew is. This feeds our family of 5 with delicious leftovers.

Eat Big MAC’s all day, every day. Just get them in the produce section of the grocery store!!

Your gut will thank you, I promise!

Brooke, RDN

Simple Crock Pot Green Chile Chicken with Masa Dumplings: FAST FOOD Part 2 of 3

Simple Crock Pot Green Chile Chicken with Masa Dumplings

Imagine your busiest day of the week filled with all things nutso where you are stretched as thin as silly putty about to snap. Then add something else to your to-do list. Like eat. Eating isn’t all bad, especially when it’s something fabulous and easy and delicious and good for your team.

Enchilada sauce, chicken, black beans and masa.  BAM! That is it my friends.

Masa? Que Paso? Masa is corn flour used to make corn tortillas and tamales. We LOVE homemade corn tortillas and tamales but again….labor of muy loco love cuz they are a crazy amount of work to make. To be fair to tortillas though, we make them several times a month and those bad boys are so worth the effort! Just not on those days when life is super nuts.

Back to masa and why it is so spectacular. Masa harina is a whole grain and because it comes from corn, it’s gluten free if that matters to you. If you need it gluten free certified make sure it’s on the label (like Bob’s Redmill). Otherwise masa is a cinch to work with and it’s super delicious, its good for you without tasting like liquid alfalfa. Sold right?

You will find it on the bottom shelf at the grocery store in the Hispanic section.

20161022_184213.jpg

We invented these masa dumplings when we had no time to make honest to goodness real homemade corn tortillas, fill them with the chicken and bake…I needed to simplify crazy delicious enchiladas. This recipe does that.

Back to dinner on the craziest day of the week.

FOUR ingredients, whole grain, whole foods….AWESOME!

20161026_172449.jpg

This recipe also has 3 different levels of difficulty based on how much time you have.

Simple Crock Pot Green Chili Chicken with Masa Dumplings

  • 1 28 oz can green chili enchilada sauce
  • ¼ can water added to the green chili enchilada can, swirled around
  • 1 15 oz can black beans, rinsed and drained
  • 1 pound chicken (pork would work too)- I only thaw it in the fridge overnight (when I remember) so it’s still pretty frozen in the morning

Use a crock-pot liner, spray with oil or do nothing at all (that’s how I do it) to the inside of the crock pot. Place enchilada sauce, water, black beans and chicken. Dial crock pot to low and let it go to work while you attack your day. I usually start this meal at 7 am, when I get home at 3 I shred the chicken and add the masa.

***EASY LEVEL ALERT*** need things simpler? Don’t add the extra water, once the chicken has cooked all day, shred it and scoop the shredded chicken into flour tortillas or corn shells. BAM…Dinner ready

***MEDIUM LEVEL ALERT *** If you have an extra hour before dinner add this step:

  • 1 2/3 cups masa (whole grain corn flour used to make tamales – you find it in the Hispanic section)
  • 1 1/4 cup warm water
  • Pinch of salt

Measure masa, add salt and blend. Add water to form dough, similar to biscuit consistency. If it’s a little sticky and wet it’s ok. If it’s so sticky you can’t get it off your fingers add a little more masa. Corn flour has no gluten so you can’t really over mix it with negative consequences.

Scoop golf ball sized globs and pat flat - about ¼ inch thick in the palm of your hand or your fingertips and drop into fully cooked shredded chicken goop in the crock pot. Spread the masa around (we push the layers of masa down with a fork) until all the masa dumplings are submerged. Crank the crockpot to high for one hour and your masterpiece will be inhaled shortly.

Serve atop fresh spinach with a side of tomatoes or summer squash. My kids love to dollop with sour cream.

Muy delicioso!

Brooke

 ***HARDEST LEVEL BASED ON TIME AND ENERGY*** Should you feel super energetic and prefer homemade green Chile tomatillo sauce, this is what I use. We grow tomatillos in the garden and literally have 2 – 5 gallon buckets of tomatillos. I love homegrown, homemade sauce so I freeze it in 4-5 cup portions and use that instead of the cans of enchilada sauce from the store.


Quick Green Chile Tomatillo Sauce

Boil

  • 5 pounds of husked tomatillos
  • 10-12 jalapenos, remove seeds and ribs if you prefer less heat
  • 2 big pinches of salt

Add enough water to cover tomatillos and jalapenos, bring to a boil and boil 10 minutes. Drain in a colander.

In your blender add:

  • 1 bunch cilantro
  • 2 medium onion, course chopped
  • 6 cloves garlic
  • 4 cups chicken broth
  • Salt to taste

Scoop enough cooked tomatillos and jalapenos into the blender to fill about 2/3 the way. Add a cup or two of the broth so things swirl and grind to your smoothness liking.

 Add olive oil to bottom of stock pot, enough to coat.

Pour blender filled with pureed goodness back into the stock pot you used to boil the tomatillos. Blend in batches remaining broth, tomatillos and jalapenos until smooth. Bring to a boil then simmer for 30 min to 1 hour.  Yields 14 cups.

Whole Grain Pumpkin Spice Pancakes

October first and officially all things pumpkin spice have bombarded our lives.

Including this blog post.

This recipe is one we have used for a few years and it’s very fitting to share it during pumpkin spice season.

Hard to imagine but these pancakes are NOT dense bricks of gut wrenching pain. They are puffy yet filling and undeniably spectacular.

Pumpkin (code for squash/veggie) is chock full of antioxidants, phytochemicals and fiber to help you from the inside out.

Squashing (hahaha) free radicals and keeping your cells stronger and healthier to help you attack each day the way you see fit.  It doesn’t hurt that they have a decent amount of fiber to help keep things moving along the way mother nature intended.

Even in the midst of anti-wheat rhetoric we still eat wheat.

Why? Why? Why? Why? Why?

  1. we don’t have celiac or wheat intolerance/allergies
  2. wheat based foods are less expensive than their gluten free cousins
  3. wheat is a terrible horrible no good very bad thing when it’s heavily processed white flour  because it’s usually combined with high fructose corn syrup, artificial colors and no redeeming health benefits – think Fruit Loops.
  4. WHOLE grains are amazing as they contain naturally occurring phytonutrients, vitamins and minerals, fiber and healthy fats.
  5. repeated studies show consumption of whole grains will REDUCE your risk of STROKE, HEART DISEASE and make it easier to MAINTAIN YOUR WEIGHT

Whole Grain Pumpkin Spice Pancakes

  • 2 cups whole wheat flour (white whole wheat works great too)

  • ¼ cup sugar (you could probably eliminate it all due to syrup being poured on top)

  • ½ tsp salt

  • 2 tsp baking powder

  • 2 tsp baking soda

  • 1 tsp cinnamon

  • 3 eggs, beaten

  • 1 cup plain yogurt (Greek or regular)

  • ¾ c milk + some to thin the batter

  • 1 ½ cups pumpkin puree

Allow for at least an hour for the whole grain to absorb liquid before cooking the pancakes. I have made the batter the night before and the before work in the morning for dinner pancakes and they turn out beautifully.

Combine dry ingredients and mix well. Combine all wet ingredients in a separate bowl and blend. Add wet ingredients to dry and mix until everything is evenly incorporated.

Let batter rest in the refrigerator to allow the whole grain to absorb. The top of the batter will oxidize a bit (turns brown) just mix it in, it’s no big deal.

Thin absorbed batter with additional milk to the consistency you like for pancake batter.

Heat your griddle to 300-325 or medium. These babies need to cook low and slow because they are so moist. Cook 3-5 minutes per side. The center will bounce back (like when testing a muffin for doneness) when they are cooked through.

If desired, add chocolate chips and pecans or walnuts as they are cooking. Top with butter and real maple syrup.

Makes about 24 four inch pancakes per batch.

You might wonder how these beauties fare on the picky scale. They are 4 out of 5 at our house, the oldest picky kiddo thought she had been poisoned when presented dinner last night. She had to forage for dinner on her own out of the fridge.

Enjoy Pumpkin Spice Season!

Brooke

Garlic - 3 Nifty Facts, Simple Recipe and Growing Your Own

Ahht, ahhht, ahhh isn't garlic the best! I use it all the time and love how it bring the flavors of food together.

1. Garlic contains two well known phytochemicals, allicin and ajoene. Allicin, responsible for it's distinctive aroma, is released as soon as you bruise the clove. The more bruising and cutting the more allicin gets released. It's this compound that may lower cholesterol, blood pressure and the risk of stomach cancer.  Ajoene is responsible for garlic's ability to make blood platelets less sticky. Completely cool that those small little things can be so powerful!

2. Garlic dates back over 6,000 years native to central Asia. Used widely in the Mediterranean, it was also so coveted it was found in King Tut's tomb in Egypt. It's also known to ward off vampires and equally as powerful,  lesson the symptoms and duration of the common cold.

Occasionally, my hubby will enjoy lunch at a Mongolian stir fry place. Upon entering the house he is detected at first wiff and risks sleeping outside if his scoop of garlic was too heavy handed. I LOVE garlic but not as a body spray. 

3. In the spring, foodie snobs can find garlic spears or garlic scapes at the farmers market. Genius on the part of the farmer or you if you grow your own. Instead of letting the bulb go to flower, and discarding the stem and spear when you harvest the cloves, you eat it! Simply cut the spears and roast (see pintrest) or sauté with other veggies.  

We saw these at Pikes Place in Seattle this past June. Totally unusual and totally cool!


SIMPLE BRUSCHETTA with GARLIC

  • 1  garlic clove crushed and finely minced
  • 4-5 tomatoes, diced (seeded if seeds bother you)
  • 5-10 basil leaves chopped
  • tiny bit of salt
  • 1 Tbsp olive oil (or more to taste)
  • 1 Tbsp balsamic vinegar (or more to taste)

If these ingredients are handy they only elevate the level of deliciousness:

  • artichoke hearts (packed in water) - diced
  • hearts of palm (packed in water) - diced
  • fresh mozzarella - diced
  • cucumber - diced

Mix and let merry for flavors to blend at least 30 minutes prior to digging in. If you want extra garlic goodness, rub a clove of raw garlic atop your piece of toasted bread...BAM! Goodness is waiting for you to enjoy.

I usually make this when I can grab crusty artisan bread off of the bakery 'day old' racks.

GROW YOUR OWN GARLIC

Garlic is a crop you actually plant in the fall.  Growing you own garlic is easy peasy.

  1. Buy an extra head (or several) of garlic at the garden center, farmers market or grocery store.
  2. Break a head of garlic into cloves, keeping the papery skin attached.
  3. Plant NOW - it's something you plant in the fall - garlic cloves about 1 inch deep in loose, healthy soil. Space cloves 4-6 inches apart in all directions.
  4. Water occasionally until the snow comes and harvest mid to late spring. When the tops start to dry up you know they are ready to pull from the ground. 
  5. Remove from the soil and dry for a few weeks. Mine dry on an old plastic sled in the garage. Knock the dry dirt off and rub loose skins off. Store in a cool dry place for your own garlic all winter long!

Happy Learning, Eating and Growing!

Brooke


Taco Tuesday with a Simple HealthyTwist

Who doesn’t love Taco Tuesday? Taco Tuesday is a meal the whole family will eat and be happy about eating.

Empowerment is probably the biggest reason why taco’s are met with so much appreciation. You put whatever you want on your taco.

  1. Immediate buy in – CHECK.
  2. Most of the food gets eaten- CHECK
  3. Healthy and satisfying – CHECK
  4. Delicious - CHECK

Olives, shredded cheese, diced tomatoes, black beans, refried beans, sour cream, avocado, salsa, crisp lettuce or fresh spinach topped with seasoned meat and whammo – a tasty dinner is served.  We also love diced sautéed summer squash with our tacos.
 

Still all the same old taco stuff right down to the ground beef or turkey sautéing up in a pan. Sprinkle it with taco seasoning.

This my friends is where the simple healthy twist comes into play.

Rather than paying about a buck for a pre-packaged taco seasoning mix, consider making your own. We have done this for several years now and I will NEVER go back.

Your homemade version will be less expensive, just as convenient AND BETTER FOR YOU!

The one you make will have no maltodextrin (sugar) used as a flowing agent to get the spices out of the machine and into the packet. It will also have almost NO sodium.

Why should I care about how much sodium I eat?

We eat too much but that isn't new news. It’s in virtually everything we purchase that has been processed in anyway. Not just chips, bouillon, canned soups and lunch meat but breads, cereals and almost every other thing that comes out of a box or a wrapper.

Salt is an incredibly cheap ingredient manufactures to add to foods because it acts as a preservative and it enhances flavor. However, too much is not good for you.

Eating too much sodium (sodium is in salt) can increase your risk of heart disease, it might increase your blood pressure and if you have congestive heart failure, cirrhosis of the liver or kidney disease it can lead to a build up a fluid which makes breathing difficult, moving difficult and living difficult.

Decreasing your sodium intake on Taco Tuesday just got simple.

You can do it a tablespoon at a time or a pint jar at a time. Here is how simple it is

TACO SEASONING

  • Chili Powder
  • Cumin
  • Garlic Powder
  • Onion Powder

Equal parts of each and you have your taco seasoning blend. Sprinkle liberally over you meat as it's browning. THAT’s IT! Unused seasoning can be stored in a glass jar with the lid tightly closed.

I buy the cheapo“5th Season” brand on the bottom shelf at the grocery store. Each bottle costs me 88¢ and will make about 12 ounces of taco seasoning for about $3.50 (30¢ per ounce) with 1/3 the sodium. One packet of prepackaged stuff will run you about $1 per ounce and have 2/3 more salt.

Taco Tuesday with a simple healthy twist is a way to enjoy a meal your family loves, save money and enjoy a healthier dinner with less sodium.

Whole foods, whole grains and simple ingredients you can pronounce while eating more produce will guarantee you several things.

You will feel awesome.

You will look awesome.

You will help others feel and look more awesome when you teach them your secrets.

Have an AWESOME Taco Tuesday!

Brooke